
While giving someone a definition of the fourth dimension is relatively easy, giving someone an intuitive understanding of the fourth dimension can be quite difficult. A definition of the fourth dimension could go like this: The fourth dimension is all space that one can get to by travelling in a direction perpendicular to three-dimensional space. Whenever an uninitiated person hears this, they start pointing their finger around in the air, trying to figure out how it's possible for such a direction to exist. Such a short explanation gives them no intuitive feeling of the fourth dimension.
In order to give you a better understanding the fourth dimension, I will begin with a method that follows a sequence of n-hypercubes that starts with the zeroth dimension and progresses up to the fourth dimension. An n-hypercube is the generalization of the cube within n dimensions, with a 3-hypercube just being the traditional cube. By seeing each n-hypercube build up from the previous one, you should have a better understanding of the final step, from the third dimension to the fourth dimension.
Imagine a point in space. It is a 0-hypercube. A point is zero dimensional because it has no width, length, or height, and is infinitely small. Every point is exactly the same and has the same measurements, because it has no dimension. Below is a picture of a point, representing the zeroth dimension.
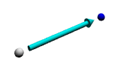
Take the zero-dimensional point and extrude it in any direction, creating a line segment, which is a 1-hypercube. All line segments are one-dimensional because they differ in size by only one measurement, length. They all have the same width and height, which is infinitely small. If you expanded the line infinitely, it would cover one-dimensional space.
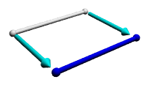
Now take the line segment and extrude it in any direction that is perpendicular to the first direction, creating a square, which is a 2-hypercube. All squares are two dimensional because they differ with each other in size by two measurements, width and length. They all have the same height, which is infinitely small. All of the edges are the same length, and all of the angles are right angles. If you expanded the square infinitely, it would cover two-dimensional space.
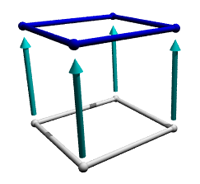
Take the non-infinite square and extrude it in a third direction, perpendicular to both of the first two directions, creating a cube, which is a 3-hypercube. All cubes are three dimensional because they differ with each other in size by all of the three measurements that we know of - width, length, and height. Just like the square, all of the edges within a single cube are the same length, and all of the angles are right angles. If you expanded the cube infinitely in all directions, it would cover three-dimensional space.
Now, the final step. Take the non-infinite cube and extrude it in yet another direction perpendicular to the first three. But how can we do this? It is impossible to do within the restrictions of the third dimension (which will I refer to as realmspace in this webpage). However, within the fourth dimension (which I call tetraspace), it is possible. The shape that results from this extrusion of a cube into tetraspace is called a tesseract, which is a 4-hypercube. All tesseracts differ from other tesseracts in size by four measurements (equal to each other within a single tesseract) - width, length, height, and a fourth measurement, which I call trength. Looking back to the previous n-dimensional cubes, they all have the same trength, which is infinitely small. Just like the cube and square, all of the edges within a single tesseract are the same length, and all of the angles are right angles. If you expanded the tesseract infinitely, it would cover four-dimensional space.
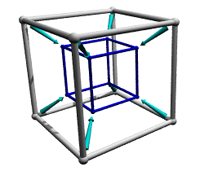
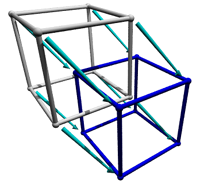
There are several ways to view the tesseract, and I will show three of them here. The first one is called an inner projection, and it is formed from a projecting the tesseract into realmspace with a perspective projection. The parts of the original tesseract that are farther away appear smaller in the inner projection. The original cube cell that existed before the extrusion into a tesseract is in gray, the paths of the vertices are in teal, and the stopping point of the extruded cube cell is in blue. The real tesseract isn't shaped like the inner projection shown below - the inner projection is a very distorted "image" of the original tesseract. All of the edges you see in the image are actually the same length as each other, and all angles between edges are right angles.
The second way to view a tesseract isn't actually a normal tesseract, but a parallel projection of a skewed tesseract. To make this shape, first you make a tesseract, then shift the top cube cell a short distance in a diagonal direction, parallel to realmspace. Since this shift is parallel to realmspace, it can actually be in any direction that you can point to. After the shift, you trace the shadow of the skewed tesseract's edges. The result is a shape that has two cubes with their vertices connected together. In the orignal shape, all of the edges within the cube cells are the same length and have right angles with each other. However, they don't have right angles with the teal connection edges, and the teal connection edges are slightly longer than the cube cells' edges.
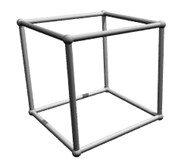
The third way to view a tesseract is a parallel projection into realmspace. It is the same as a skewed tesseract, but without the top cube cell shifted. Since the edges of the tesseract were extruded in a direction perpendicular to realmspace, when the shape is projected back into realmspace, the edges of the blue cube cell are projected straight back onto the gray cube cell's edges. The resulting projection is a simple cube. This didn't happen with the inner projection, because that projection was a perspective projection.
This last step of trying to view a tesseract shows the difficulties in portraying objects from tetraspace within the limitations of realmspace - there is an extra perpendicular direction that we can't depict within our own space without distorting the original object. Because of these problems, it takes many examples in order to begin understanding the nature of the fourth dimension.
You have now seen a glimpse of the fourth dimension. This is only the beginning - there are many more aspects of the fourth dimension to explore. In the rest of these pages, I will discuss many properties of the fourth dimension - rotation, flatness, levitation, shapes, water, and many others. By the time you are finished, you should have learned many interesting things about the fourth dimension, and maybe you will have even made some discoveries of your own.
The text will frequently refer to technical terms, which are in bold when they first appear. You can find these terms in the glossary if you need further explanation. If you can't figure out the meaning of a word and the glossary doesn't help, post a message on the fourth dimension discussion forum and someone will answer your question.
Good luck on learning about the fourth dimension! I hope you have as much fun as I do.
For other short introductions to the fourth dimension, check out my page of links to short introductions.